In the tutorial Laminas: Part 1 – User authentication using LmcUser, we used the package LM-Commons/LmcUser, to add user authentication to a Laminas MVC application.
Off the shelf, LmcUser provides very basic building blocks such as a very basic User entity and very simple views to login, logout and register.
In this tutorial, let’s customize the building blocks of LmcUser such that you understand how to tailor it to suit your application needs. In fact, we will not modify the LmcUser code base itself as LmcUser provides methods to extend its classes and services.
In this tutorial, we will learned:
- How to customize the User entity class
- How to customize the register form and other forms
- How to customize the user page view or any other views
Getting started
This tutorial is based on the example application developed in the Laminas: Part 1 – User authentication using LmcUser.
It is not mandatory to have completed that tutorial in order to follow this tutorial. A complete version of the LmcUser tutorial application is available in the https://github.com/visto9259/lmc-user-tutorial/tree/lmcuser-tutorial-part1 repository. To install, just clone it and run the PHP server locally:
$ git clone --branch lmcuser-tutorial-part1 https://github.com/visto9259/lmc-user-tutorial
$ cd lmc-user-tutorial
$ composer install
$ composer development-enable
$ composer serve
The application will start at localhost:8080.
This example application has one user already defined. You can log in using john@example.com with the password 123456.
Setting things up
In order to keep things tidy, let’s create a new module, called User, where we will hold all our customizations. As mentioned in the introduction, customizations to the LmcUser building block are mainly “overrides” to the LmcUser code base.
If you previously built the Album application upon which the Laminas: Part 1 – User authentication using LmcUser is based, then you should know how to add a new module to a Laminas MVC application. But just in case you skipped the tutorial, let’s do it again.
Create a module directory structure for the User module:
/module
   /Album
   /Application
   /User
      /config
      /src
      /view
Update the autoloader in composer.json to add the User namespace:
    "autoload": {
        "psr-4": {
            "Application\\": "module/Application/src/",
            "Album\\": "module/Album/src/",
            "User\\": "module/User/src/"
        }
    },
Update the Composer autoloading rules:
$ composer dump-autoload
Create a empty module config file module.config.php in the config folder:
<?php

return [

];
Create a Module class file in the module/User/src folder:
<?php

namespace User;

use Laminas\ModuleManager\Feature\ConfigProviderInterface;

class Module implements ConfigProviderInterface
{
    public function getConfig()
    {
        return include __DIR__ . "/../config/module.config.php";
    }
}
And lastly, add the new module to the list of modules to load in /config/modules.config.php.
<?php

/**
 * List of enabled modules for this application.
 *
 * This should be an array of module namespaces used in the application.
 */
return [
    'Laminas\Mvc\Plugin\FlashMessenger',
    'Laminas\Mvc\Plugin\Prg',
    'Laminas\Session',
    'Laminas\Navigation',
    'Laminas\Form',
    'Laminas\I18n',
    'Laminas\InputFilter',
    'Laminas\Filter',
    'Laminas\Hydrator',
    'Laminas\Db',
    'Laminas\Router',
    'Laminas\Validator',
    'Application',
    'Album',
    'LmcUser',
    'User',
];
Make sure that the User module entry is after the LmcUser module entry. The reason why this is important, is because the Module Manager will create an overall configuration by aggregating all the configurations provided by the modules in the order in which the modules are listed in modules.config.php. If there are duplicate configuration entries, the last entry will override the previous entry. We will use this feature to override some of the LmcUser services.
You can learn more about configuration in the Advanced Configuration Tricks section of the Laminas MVC Tutorial.
Customizing the User entity class
The first simple customization is to modify the User entity class used by LmcUser. By default, LmcUser uses the class LmcUser\Entity\User to hold user properties:
namespace LmcUser\Entity;

class User implements UserInterface
{
    /**
     * @var int
     */
    protected $id;

    /**
     * @var string
     */
    protected $username;

    /**
     * @var string
     */
    protected $email;

    /**
     * @var string
     */
    protected $displayName;

    /**
     * @var string
     */
    protected $password;

    /**
     * @var int
     */
    protected $state;

    /* .... */
    /* public methods */

}
Very basic indeed! And it is probably not suitable for your needs.
For example, what if we wanted to add a tagline property where we could store a simple tagline for the user. For example, the tagline could be “I love the Beatles”. How can we extend LmcUser to also have a tagline property?
Modifying the User entity class
The User entity class that LmcUser uses is configured by the user_entity_class key in the lmc_user configuration which is located in the config/autoload/lmcuser.global.php file. This defaults to the \LmcUser\Entity\User class:
/* config/autoload/lmcuser.global.php */
<?php

/**
 * LmcUser Configuration
 *
 * If you have a ./config/autoload/ directory set up for your project, you can
 * drop this config file in it and change the values as you wish.
 */

$settings = [

    /* ... */

    /**
     * User Model Entity Class
     *
     * Name of Entity class to use. Useful for using your own entity class
     * instead of the default one provided. Default is LmcUser\Entity\User.
     * The entity class should implement LmcUser\Entity\UserInterface
     */
    //'user_entity_class' => \LmcUser\Entity\User::class,

    /* the rest of the file... */
]
So let’s modify the User entity to add a tagline property. One simple method is to create a new User entity class that extends \LmcUser\Entity\User. You also need to add methods to populate the tagline property. LmcUser uses a setter/getter hydrator by default and therefore you need to add getTagline and setTagline methods.
Note: Let’s keep things simple for now by adding a simple scalar type property, such as a string, to the user entity class. The reason is that the built-in mapper and hydrator can easily handle simple scalar type properties. To handle more complex properties such as an array of string, which would be more suitable, for example, for roles, then we also need to work on new mappers and hydrators. We will address these changes in a separate tutorial.
Create a new User entity class that extends the \LmcUser\Entity\User class in module/User/src/Entity/User.php:
<?php
/* src/User/Entity/User.php */

namespace User\Entity;

class User extends \LmcUser\Entity\User
{
    protected ?string $tagline = null;

    public function getTagline(): ?string
    {
        return $this->tagline;
    }

    public function setTagline(?string $tagline): User
    {
        $this->tagline = $tagline;
        return $this;
    }
}
Before we can use this new User entity class, you need to modify the user table in the laminastutorial.db database to add a tagline column. Add a simple varchar column called tagline:
$ sqlite3 data/laminastutorial.db
sqlite> ALTER TABLE user ADD COLUMN tagline varchar(100);
sqlite> .quit
Let’s add a tagline to the user john@example.com and validate that it has been added:
$ sqlite3 data/laminastutorial.db
sqlite> UPDATE user SET tagline='I love the Beatles' WHERE email='john@example.com';
sqlite> SELECT * FROM user WHERE email='john@example.com';
0||john@example.com||$2y$14$MGuj.nnEGvBMoK6riwhrk.AZKYpTKE4KPvwP8c0KwMlHETSVVjb2O||I love the Beatles
sqlite> .quit
Now we can configure LmcUser to use the new User entity class. Modify the user_entity_class configuration entry in the /config/autoload/lmcuser.global.php file:
/* config/autoload/lmcuser.global.php */
<?php

/**
 * LmcUser Configuration
 *
 * If you have a ./config/autoload/ directory set up for your project, you can
 * drop this config file in it and change the values as you wish.
 */

$settings = [

    /* ... */

    /**
     * User Model Entity Class
     *
     * Name of Entity class to use. Useful for using your own entity class
     * instead of the default one provided. Default is LmcUser\Entity\User.
     * The entity class should implement LmcUser\Entity\UserInterface
     */
    'user_entity_class' => \User\Entity\User::class,

    /* the rest of the file... */
]
Now, if you reload the application, it should still work as expected.
How can you access the new tagline property?
Remember from the Laminas: Part 1 – User authentication using LmcUser, that there are plugins to access the user identity:
- In controllers,
$this->lmcUserAuthenticaion()->getIdentity()will return the new\User\Entity\Userobject - In views,
$this->lmcUserIdentity()will return the new\User\Entity\Userobject
Let’s put this new property to some use.
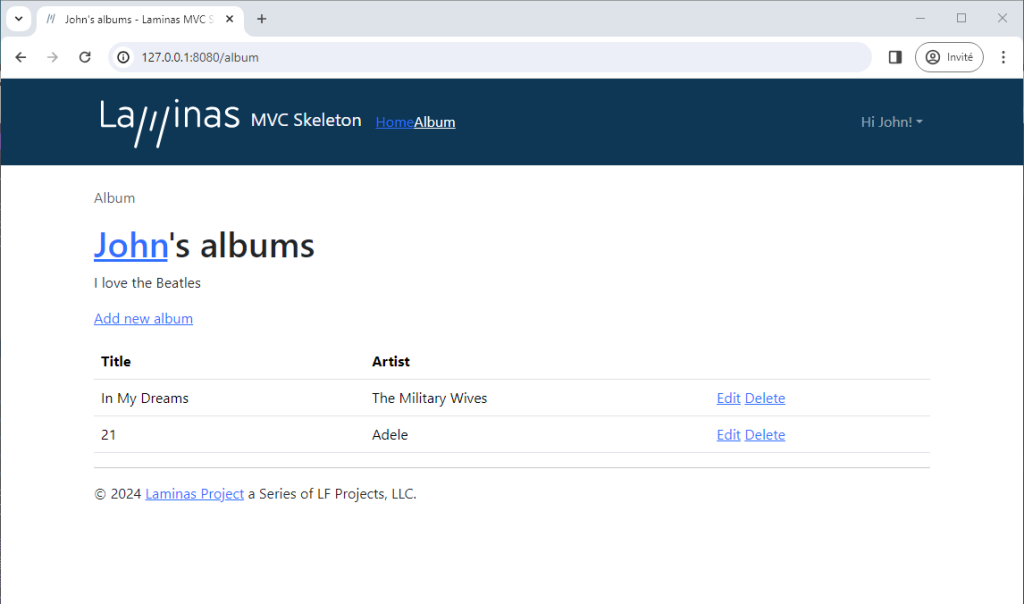
We will make a simple modification to the Album page to show the user’s tagline. This may not be the most useful usage of the new tagline property but it is sufficient for this tutorial.
Modify the Album index view to display the user’s tagline, if present. In module/Album/view/album/album/index.phtml, make the highlighted changes:
<?php
// module/Album/view/album/album/index.phtml:
$displayName = $this->lmcUserDisplayName();
$title = $displayName . '\'s albums';
$this->headTitle($title);
$userIdentity = $this->lmcUserIdentity();
$mailTo = 'mailto:' . $userIdentity->getEmail();
?>
<h1><a href="<?= $mailTo;?>"><?= $displayName;?></a>'s album</h1>
<?php if ($this->lmcUserIdentity()->getTagline()): ?>
<p><?=$this->lmcUserIdentity()->getTagline()?>.</p>
<?php endif; ?>
<p>
<a href="<?= $this->url('album', ['action' => 'add']) ?>">Add new album</a>
</p>
/* ... the rest of the file */
The page should now look like this:

Customizing the user register form
Now that we have added the tagline property to the User entity class, we need for the user to be able to enter it during registration.
Note: LmcUser v3 does not currently provide building blocks to modify an existing user. This should be an enhancements for future versions. Therefore, for the purpose of this tutorial, we will add the capability to set the tagline during user registration.
LmcUser uses a form to capture user data during the registration process. When navigating to the /user/register URL, the register action of the User controller is executed. The action instantiate a register form that is passed as a parameter to the register view.
This register form is not hardcoded in the register action. Instead, the action instantiate the form by requesting it through the Service Manager using the name 'lmcuser_register_form'. LmcUser configures the Service Manager, when requesting 'lmcuser_register_form', to invoke the factory LmcUser\Factory\Form\Register that creates a LmcUser\Form\Register object with a few validations. This process may look complicated to create a simple register form but it allows you to “override” this process by your own factory and form if you want to.
The register view will then use this register form and simply iterate through the form’s elements to create the HTML for the form. You can override the register view as well and we will cover this later.
From here, in order to add the tagline field in the form generated by the register view, there are two options:
- Override the factory that creates the register form to create your own form. This is however complicated since you need to ensure that your factory creates a form that has all the elements required by the register action, that the form’s data hydrator is set properly, etc. To use this option, you will need to review the LmcUser code to undertand what it does in order to replicate the same behavior.
- Use a delegate factory to “decorate” the register form with the new field. “Decorating” in this context is simply to add a new element to the form to capture the tagline. This may sound complicated but this is the simplest option considering that the new element to add is a simple text field.
Note: Using delegate factories is not covered by the Laminas Album tutorial. Delegators are documented in the Laminas Service Manager Reference.
Let’s create a delegator that will add the new tagline element to the register form and add this delegator to the Service Manager configuration.
Create the delegator class in the file module/User/src/Form/RegisterFormDelegatorFactory.php:
<?php

namespace User\Form;

use Laminas\Form\FormInterface;
use Laminas\ServiceManager\Factory\DelegatorFactoryInterface;
use LmcUser\Form\Register;
use Psr\Container\ContainerInterface;

class RegisterFormDelegatorFactory implements DelegatorFactoryInterface
{

    /**
     * @inheritDoc
     */
    public function __invoke(ContainerInterface $container, $name, callable $callback, ?array $options = null): Register
    {
        // Create the instance
        /** @var Register $form */
        $form = call_user_func($callback, $options);

        // Add the tagline element. The name of the element must match the property in the User entity
        $form->add([
            'name' => 'tagline',
            'type' => \Laminas\Form\Element\Text::class,
            'options' => [
                'label' => 'Tagline'
            ],
        ]);

        // We could get fancy and add filtering and validation if we wanted to
        return $form;
    }
}
So what’s happening here? The delegator is invoked by the Service Manager. The delegator uses the callback function $callback to instantiate the object referenced by '$name‘. The object returned by the callback is the register form (\LmcUser\Form\Register). Lastly, we add a simple text input element to the form and return the “decorated” form.
To add the delegator to the Service Manager, we need to modify the module/User/config/module.config.php file with the follwing changes:
<?php

return [
    'service_manager' => [
        'delegators' => [
            'lmcuser_register_form' => [
                \User\Factory\RegisterFormDelegatorFactory::class,
            ]
        ],
    ],
];
This configuraton tells the Service Manager to invoke the delegator \User\Factory\RegisterFormDelegatorFactory when instantiating the object/service 'lmcuser_register_form'.
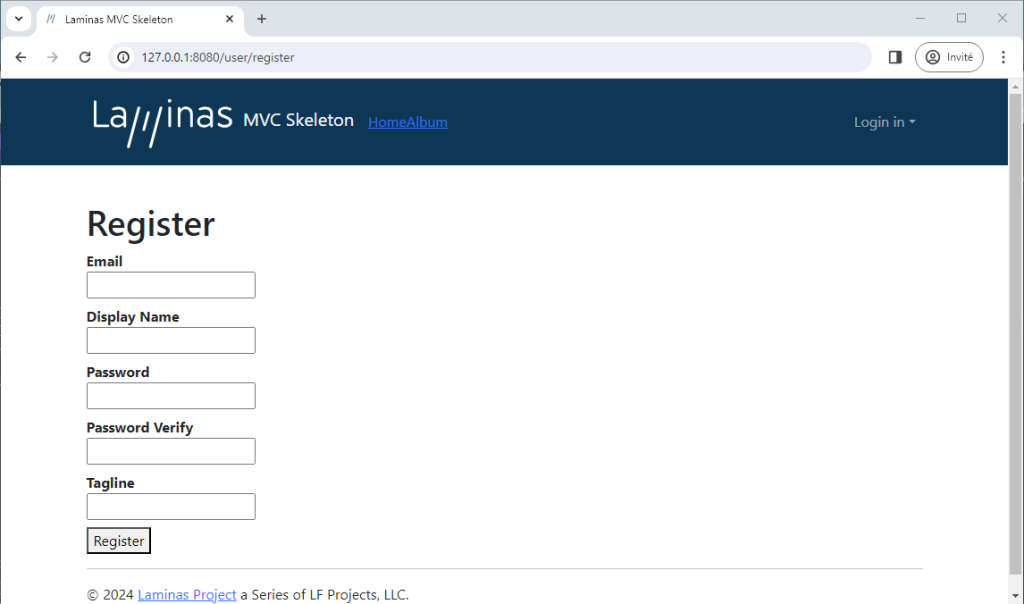
Let’s try it out. Make sure that the user is logged out and go to localhost:8080/user/register. You should get the following:

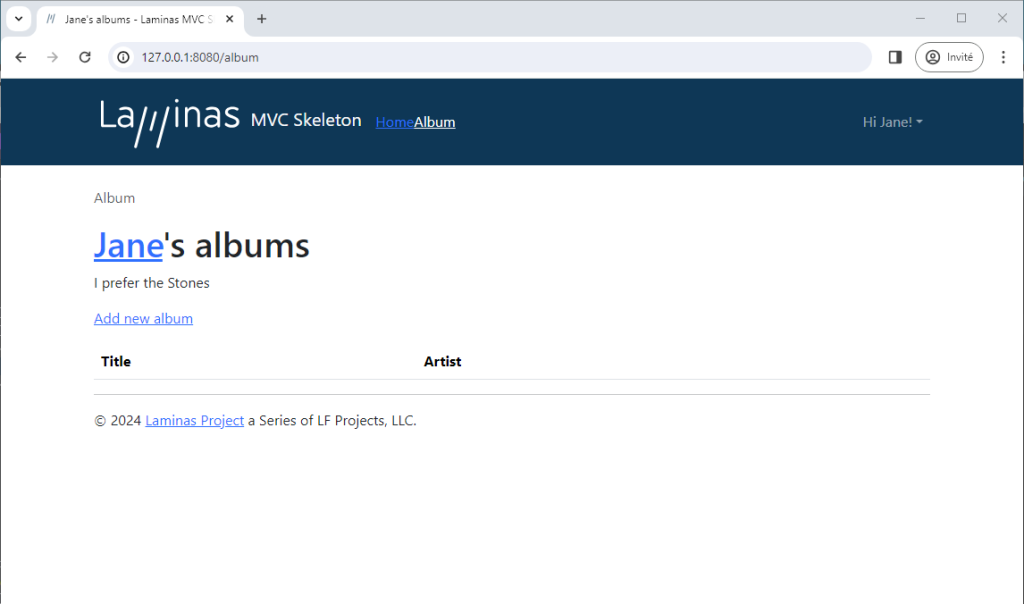
Let’s create a new user with the username jane@example.com, password 123456, display name Jane and tageline I prefer the Stones.
You should get the following Album’s page:

Customizing the other forms
The same process can be used the other forms that LmcUser uses for login and to change the email and password. These forms are instantiated from the following aliases:
- ‘lmcuser_login_form’
- ‘lmcuser_change_password_form’
- ‘lmcuser_change_email_form’
Customizing views
Up to now, we have added the new tagline property to the Album’s main page. It somewhat makes sense but it would make more sense to also have the tagline show up on the user’s profile page.
We can achieve this by “overriding” the view template used by the Index action of the User controller.
LmcUser is a typical Laminas MVC module. Each action in the User controller returns a View Model that gets maps to a template. LmcUser uses a view template stack configuration to assign the right template to each action:
    'view_manager' => [
        'template_path_stack' => [
            'lmcuser' => __DIR__ . '/../view',
        ],
    ],
where __DIR__ . '/../view' points to the top of the view directory structure at /vendor/lm-commons/lmc-user/view:
/vendor/
   lm-commons/
      lmc-user/
         view/
           lmc-user/
              user/
                index.phtml
                login.phtml
                ....
Laminas MVC will set the template for the index action of the User controller automatically to 'lmc-user/user/index' which, given the template stack above, will point to the file login.phtml.
Note: Why 'lmc-user/user/index' instead of 'lmcuser/user/index'? Laminas MVC uses name inflection to convert camel case names like LmcUser to lmc-user. Hence the reason why the view directory structure is lmc-user instead of lmcuser.
Let’s create our own template for the user index page. We will start from the existing template and adjust it to show the tagline. While we are at it, let’s make the view a little more beautiful by using some Bootstrap styles. Copy the index template vendor/lm-commons/lmc-user/view/lmc-user/user/index.phtml to module/User/view/lmc-user/user/index.phtml and modify it as follows:
<div class="row">
    <div class="col-1 m-1">
        <div><?php echo $this->gravatar($this->lmcUserIdentity()->getEmail()) ?></div>
    </div>
    <div class="col m-1">
        <h3><?php echo $this->translate('Hello'); ?>, <?php echo $this->escapeHtml($this->lmcUserDisplayName()) ?>!</h3>
        <p><?= $this->lmcUserIdentity()->getTagline();?></p>
        <a class="btn btn-primary" href="<?php echo $this->url('lmcuser/logout') ?>"><?php echo $this->translate('Sign Out'); ?></a>
    </div>
</div>
Then let’s also add a view template map in module/config/module.config.php to configure the View Manager to pick up our new template:
<?php

return [
    'service_manager' => [
        'delegators' => [
            'lmcuser_register_form' => [
                \User\Factory\RegisterFormDelegatorFactory::class,
            ]
        ],
    ],
    'view_manager' => [
        'template_map' => [
            'lmc-user/user/index' => __DIR__ . '/../view/lmc-user/user/index.phtml',
        ],
    ],
];
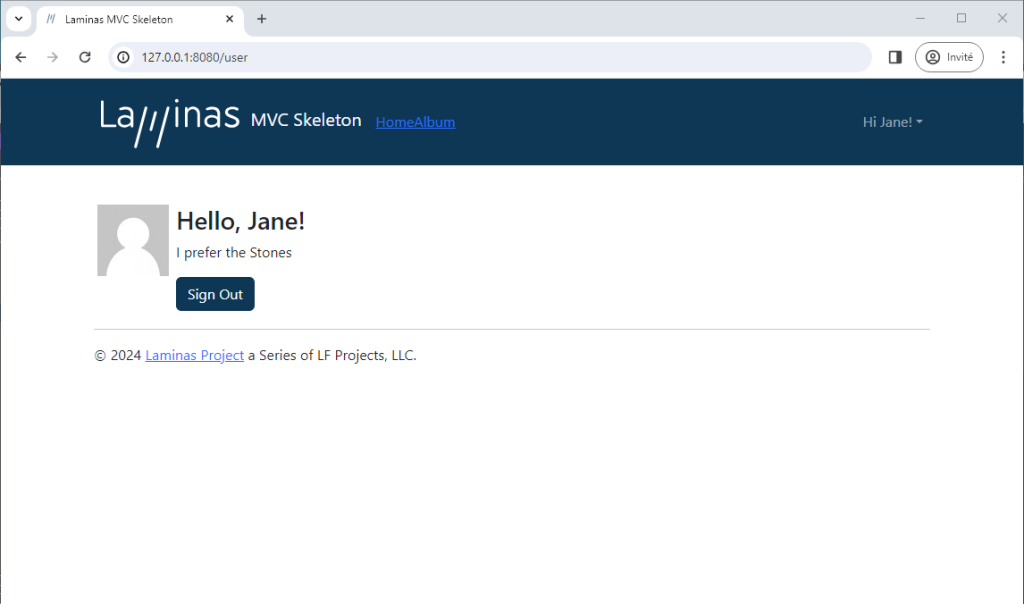
Let’s check it out. Navigate to localhost:8080/user and you should get the following:

Conclusion
In this tutorial, we learned:
- How to customize the User entity class
- How to customize the register form and other forms
- How to customize the user page view or any other views
Next steps
These were simple customizations to show that LmcUser can be easily adapted to your needs.
In the next tutorials, we will go deeper in customizations:
- Laminas: Part 3 – Advanced User Customizations
- Laminas: Part 4 – Performing additonal actions on user actions (to come)
Previous tutorials:
